ActiveMQ
aliases:
- activeMQ 标题: activeMQ
SpringBoot 整合 ActiveMQ
笔记本: activeMQ
创建时间: 2023/12/11 13:38 更新时间: 2024/5/2 18:41
SpringBoot 整合 ActiveMQ
多个queue和多个topic实现,及前端VUE使用Stompjs接收
一、ActiveMQ简介
1). ActiveMQ
ActiveMQ是Apache所提供的一个开源的消息系统,完全采用Java来实现,
因此,它能很好地支持J2EE提出的JMS(Java Message Service,即Java消息服务)规范。
JMS是一组Java应用程序接口,它提供消息的创建、发送、读取等一系列服务。
JMS提供了一组公共应用程序接口和响应的语法,类似于Java数据库的统一访问接口JDBC,
它是一种与厂商无关的API,使得Java程序能够与不同厂商的消息组件很好地进行通信。
2). Java Message Service(JMS)
JMS支持两种消息发送和接收模型。
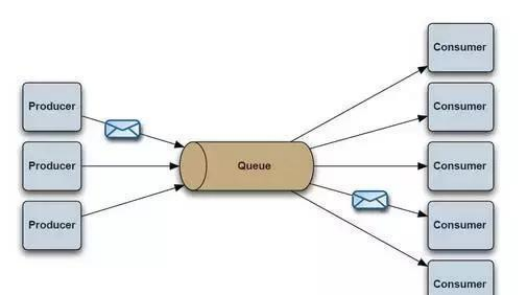
一种称为P2P(Ponit to Point)模型,即采用点对点的方式发送消息。
P2P模型是基于队列的,消息生产者发送消息到队列,消息消费者从队列中接收消息,
队列的存在使得消息的异步传输称为可能,P2P模型在点对点的情况下进行消息传递时采用。
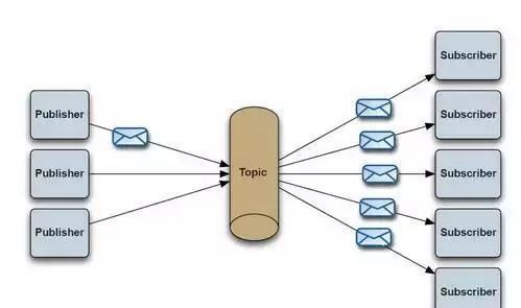
另一种称为Pub/Sub(Publish/Subscribe,即发布-订阅)模型,发布-订阅模型定义了如何向一个内容节点发
这个内容节点称为topic(主题)。主题可以认为是消息传递的中介,消息发布这将消息发布到某个主题,
而消息订阅者则从主题订阅消息。主题使得消息的订阅者与消息的发布者互相保持独立,
不需要进行接触即可保证消息的传递,发布-订阅模型在消息的一对多广播时采用。
3). JMS术语
Provider/MessageProvider:生产者
Consumer/MessageConsumer:消费者
PTP:Point To Point,点对点通信消息模型
Pub/Sub:Publish/Subscribe,发布订阅消息模型
Queue:队列,目标类型之一,和PTP结合
Topic:主题,目标类型之一,和Pub/Sub结合
ConnectionFactory:连接工厂,JMS用它创建连接
Connnection:JMS Client到JMS Provider的连接
Destination:消息目的地,由Session创建
Session:会话,由Connection创建,实质上就是发送、接受消息的一个线程,因此生产者、消费者都
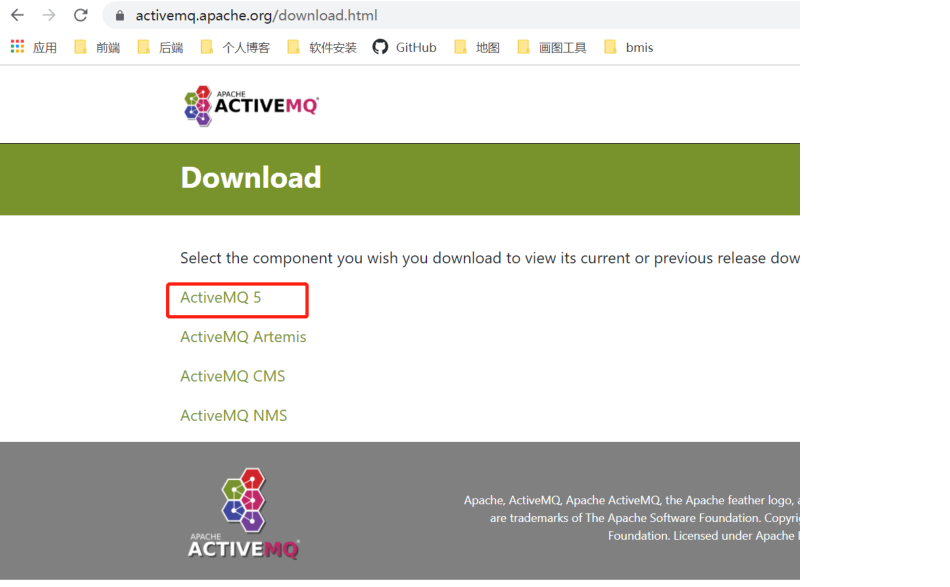
二、Windows安装 ActiveMq
1、下载地址:http://activemq.apache.org/download-archives.html ,
本文用的是windows版的5.15.10版本,下载下来是压缩包。apache-activemq-5.15.10-bin.tar.gz
2、将压缩包解压一个到目录下,CMD进入到解压目录下的bin目录下,执行 activemq.bat start 启动。
http://localhost:8161/admin(用户名和密码默认为admin),则启动成功。
三、SpringBoot 集成 ActiveMQ
1. 创建一个springboot项目,添加依赖
 <!--ActiveMq-->
 <dependency>
 	<groupId>org.springframework.boot</groupId>
 	<artifactId>spring-boot-starter-activemq</artifactId>
 	<!-- <version>2.1.0.RELEASE</version> -->
 </dependency>

 <!--消息队列连接池-->
 <dependency>
 	<groupId>org.apache.activemq</groupId>
 	<artifactId>activemq-pool</artifactId>
 	<!-- <version>5.15.7</version> -->
 </dependency>
2、application.yml文件的配置
 server:
 	port: 8090
 spring:
     activemq:
		broker-url: tcp: //192.168.111.200:61616
		user: admin
 		password: admin
 		close-timeout: 15s # 在考虑结束之前等待的时间
 		in-memory: true # 默认代理URL是否应该在内存中。如果指定了显式代理,则忽略此值。
 		non-blocking-redelivery: false # 是否在回滚回滚消息之前停止消息传递。这意味着当启用此命令时,
 		send-timeout: 0 # 等待消息发送响应的时间。设置为0等待永远。
		queue-name: active.queue
		topic-name: active.topic.name.model

# packages:
# trust-all: true #不配置此项,会报错
	pool:
		enabled: true
		max-connections: 10 #连接池最大连接数
 		idle-timeout: 30000 #空闲的连接过期时间,默认为30秒

 # jms:

 # pub-sub-domain: true #默认情况下activemq提供的是queue模式,若要使用topic模式需要配置此项
 #其他配置项:
 # 是否信任所有包
 #spring.activemq.packages.trust-all=
 # 要信任的特定包的逗号分隔列表(当不信任所有包时)
 #spring.activemq.packages.trusted=
 # 当连接请求和池满时是否阻塞。设置false会抛“JMSException异常”。
 #spring.activemq.pool.block-if-full=true
 # 如果池仍然满,则在抛出异常前阻塞时间。
 #spring.activemq.pool.block-if-full-timeout=-1ms
 # 是否在启动时创建连接。可以在启动时用于加热池。
 #spring.activemq.pool.create-connection-on-startup=true
 # 是否用Pooledconnectionfactory代替普通的ConnectionFactory。
 #spring.activemq.pool.enabled=false
 # 连接过期超时。
 #spring.activemq.pool.expiry-timeout=0ms
 # 连接空闲超时
 #spring.activemq.pool.idle-timeout=30s
 # 连接池最大连接数
 #spring.activemq.pool.max-connections=1
 # 每个连接的有效会话的最大数目。
 #spring.activemq.pool.maximum-active-session-per-connection=500
 # 当有"JMSException"时尝试重新连接
 #spring.activemq.pool.reconnect-on-exception=true
 # 在空闲连接清除线程之间运行的时间。当为负数时,没有空闲连接驱逐线程运行。
 #spring.activemq.pool.time-between-expiration-check=-1ms
 # 是否只使用一个MessageProducer
 #spring.activemq.pool.use-anonymous-producers=true
3、启动类增加 @EnableJms 注解
import org.springframework.boot.SpringApplication;
import org.springframework.boot.autoconfigure.SpringBootApplication;
import org.springframework.jms.annotation.EnableJms;

@SpringBootApplication
@EnableJms //启动消息队列
public class SpringbootActivemqApplication {

    public static void main(String[] args) {
        SpringApplication.run(SpringbootActivemqApplication.class, args);
    }
}
4、初始化和配置 ActiveMQ 的连接
import org.apache.activemq.ActiveMQConnectionFactory;
import org.apache.activemq.command.ActiveMQQueue;
import org.apache.activemq.command.ActiveMQTopic;
import org.springframework.beans.factory.annotation.Value;
import org.springframework.context.annotation.Bean;
import org.springframework.context.annotation.Configuration;
import org.springframework.jms.config.JmsListenerContainerFactory;
import org.springframework.jms.config.SimpleJmsListenerContainerFactory;
import org.springframework.jms.core.JmsMessagingTemplate;
import javax.jms.ConnectionFactory;
import javax.jms.Queue;
import javax.jms.Topic;

@Configuration
public class BeanConfig {

    @Value("${spring.activemq.broker-url}")
    private String brokerUrl;

    @Value("${spring.activemq.user}")
    private String username;

    @Value("${spring.activemq.topic-name}")
    private String password;

    @Value("${spring.activemq.queue-name}")
    private String queueName;

    @Value("${spring.activemq.topic-name}")
    private String topicName;

    @Bean(name = "queue")
    public Queue queue() {
        return new ActiveMQQueue(queueName);
    }

    //如果有多个queue主题,则继续增加@Bean, @Bean内的name可省略,省略后name为方法名("queue2"),
    //注意: 后续@Autowired注解“public Queue queue2;”的变量名为此处的name("queue2");
    //队列名称为"queueName2", 后续的队列消费时destination要和此队列名称一致。
    @Bean(name = "queue2")
    public Queue queue2() {
        return new ActiveMQQueue("queueName2");
    }

    //其他的queue主题定义
    //...

    @Bean(name = "topic")
    public Topic topic() {
        return new ActiveMQTopic(topicName);
    }

    @Bean(name = "topic2")
    public Topic topic2() {
        return new ActiveMQTopic("topicName2");
    }

    //其他的topic主题定义
    //...

    @Bean
    public ConnectionFactory connectionFactory(){
        return new ActiveMQConnectionFactory(username, password, brokerUrl);
    }

    @Bean
    public JmsMessagingTemplate jmsMessageTemplate(){
        return new JmsMessagingTemplate(connectionFactory());
    }

    // 在Queue模式中,对消息的监听需要对containerFactory进行配置
    @Bean("queueListener")
    public JmsListenerContainerFactory<?> queueJmsListenerContainerFactory(ConnectionFactory connectionFactory){
        SimpleJmsListenerContainerFactory factory = new SimpleJmsListenerContainerFactory();
        factory.setConnectionFactory(connectionFactory);
        factory.setPubSubDomain(false);
        return factory;
    }

    //在Topic模式中,对消息的监听需要对containerFactory进行配置
    @Bean("topicListener")
    public JmsListenerContainerFactory<?> topicJmsListenerContainerFactory(ConnectionFactory connectionFactory){
        SimpleJmsListenerContainerFactory factory = new SimpleJmsListenerContainerFactory();
        factory.setConnectionFactory(connectionFactory);
        factory.setPubSubDomain(true);
        return factory;
    }
}
5、生产者(queue 和 topic)
import org.springframework.beans.factory.annotation.Autowired;
import org.springframework.jms.core.JmsMessagingTemplate;
import org.springframework.web.bind.annotation.PostMapping;
import org.springframework.web.bind.annotation.RequestBody;
import org.springframework.web.bind.annotation.RestController;
import javax.jms.Destination;
import javax.jms.Queue;
import javax.jms.Topic;

@RestController
public class ProducerController{

	@Autowired
	private JmsMessagingTemplate jmsMessagingTemplate;

	@Autowired
	private Queue queue;

	@Autowired
	private Queue queue2;

	//更多的Queue...
	@Autowired
	private Topic topic;

	//更多的topic...

	@PostMapping("/queue/test")
	public String sendQueue(@RequestBody String str) {
		this.sendMessage(this.queue, str);
		return "success";
	}

	@PostMapping("/queue2/test")
	public String sendQueue(@RequestBody String str) {
		this.sendMessage(this.queue2, str);
		return "queue2 success";
	}

	@PostMapping("/topic/test")
	public String sendTopic(@RequestBody String str) {
		this.sendMessage(this.topic, str);
		return "success";
	}

	// 发送消息,destination是发送到的队列,message是待发送的消息
	private void sendMessage(Destination destination, final String message){
		jmsMessagingTemplate.convertAndSend(destination, message);
	}

}
6、Queue模式的消费者
import org.springframework.jms.annotation.JmsListener;
import org.springframework.stereotype.Component;

@Component
public class QueueConsumerListener{

	//queue模式的消费者
	@JmsListener(destination="${spring.activemq.queue-name}", containerFactory="queueListener")
	public void readActiveQueue(String message) {
		System.out.println("queue接受到:" + message);
	}

	//queue2模式的消费者,
	//destination为queue主题,和ActiveMQBeanConfig定义中的@Bean中的"new ActiveMQQueue("queueName2");"的
	@JmsListener(destination="queueName2", containerFactory="queueListener")
	public void readActiveQueue(String message) {
		System.out.println("queue2接受到:" + message);
	}

	//更多的queue模式的消费者。。。

}
7、topic模式的消费者
import org.springframework.jms.annotation.JmsListener;
import org.springframework.stereotype.Component;

@Component
public class TopicConsumerListener{

	//topic模式的消费者
	@JmsListener(destination="${spring.activemq.topic-name}", containerFactory="topicListener")
	public void readActiveQueue(String message) {
		System.out.println("topic接受到:" + message);
	}

	//其他的topic模式的消费者。。。

}
8、测试(使用Postman发消息)
(1) POST: http://localhost:8090/ queue /test 消息体:{"aaa" : "queue"} 控制台打印: queue 接受到:{"aaa" : "queue"} 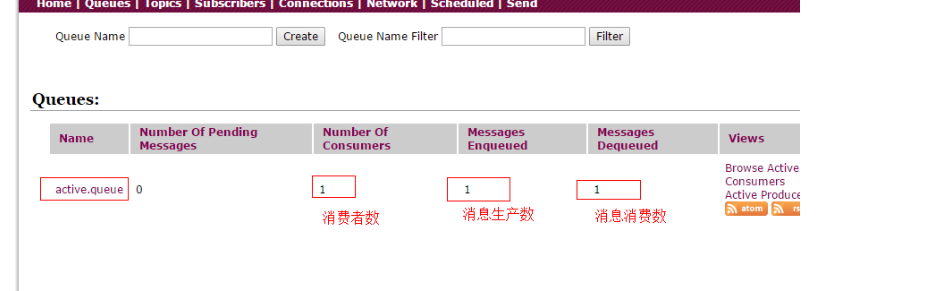
(2) POST: http://localhost:8090/ queue2 /test 消息体:{"bbb" : "queue2"} 控制台打印: queue2 接受到:{"bbb" : "queue2"} 
(3) POST: http://localhost:8090/ topic /test 消息体:{"aaa" : "topic"} 控制台打印: topic 接受到:{"aaa" : "topic"} 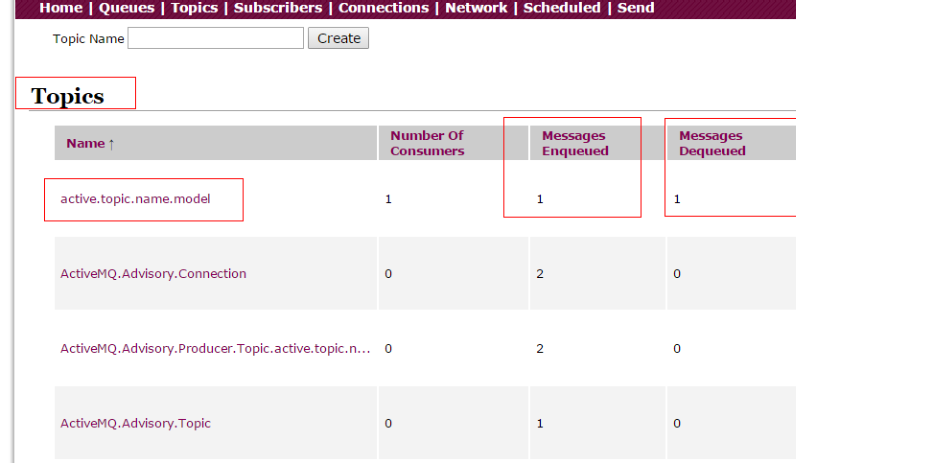
topic模式有普通订阅和持久化订阅
普通订阅:在消费者启动之前发送过来的消息,消费者启动之后不会去消费;
持久化订阅: 在消费者启动之前发送过来的消息,消费者启动之后会去消费;
四、前端VUE使用Stompjs接收ActiveMQ消息
引用原文链接:https://blog.csdn.net/yuandongy/article/details/103261001
1 创建vue项目
vue init webpack demo
2 进入demo文件夹,安装stompjs,net
cd demo
npm install stompjs
npm install net
3 在config下添加linkparam.js
export const MQ_SERVICE = 'ws://192.168.111.200:61614/stomp' // mq服务地址
export const MQ_USERNAME = 'admin' // mq连接用户名
export const MQ_PASSWORD = 'admin' //mq连接密码
4 在src/components下添加sock.vue文件
< template >
	<div>
    	socket is loading...
	</div>
</template >

<script>
		import Stomp from 'stompjs';
		import {MQ_SERVICE, MQ_USERNAME, MQ_PASSWORD} from '../../config/linkparam.js';
		export default {
			name: 'entry',
    		data () {
				return {
      				client: Stomp.client(MQ_SERVICE);
				}
			},

			created () {
				this.connect();
			},

			methods: {
				onConnected: function (frame) {
					console.log('Connected: ' + frame);
					var queue= 'active.queue';
    				this.client.subscribe(queue, this.responseCallback, this.onFailed);
    				var topic = 'active.topic.name.model';
    				this.client.subscribe(topic, this.responseCallback, this.onFailed);
			},

			onFailed: function (frame) {
				console.log('Failed: ' + frame);
    		},
    		responseCallback: function (frame) {
      			console.log('responseCallback msg=>' + frame.body);
				console.log('------');
			},
    		connect: function () {
				var headers = {
      				'login': MQ_USERNAME,
    				'passcode': MQ_PASSWORD
				}
    			this.client.connect(headers, this.onConnected, this.onFailed);
			}
		}
}
  </script>
5 修改src/App.vue
<template>
	<div id="app">
		<sock/>
	</div>
</template>

<script>
	import HelloWorld from './components/HelloWorld'
	import sock from './components/sock'
	export default {
		name: 'App',
		components: {
			sock
		}
	}
</script>

<style>
	#app {
		font-family: 'Avenir', Helvetica, Arial, sans-serif;
		-webkit-font-smoothing: antialiased;
		-moz-osx-font-smoothing: grayscale;
		text-align: center;
		color: #2c3e50;
		margin-top: 60px;
	}
</style>
6 运行vue
npm run dev
7 测试
进入ActiveMQ控制台,如下, 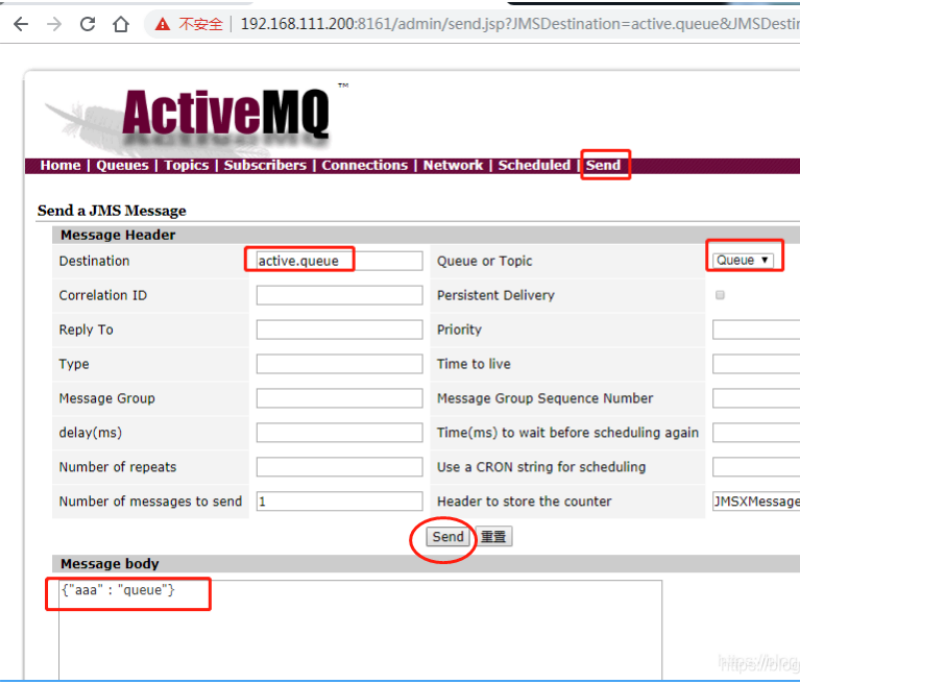
设置好后,点击“send”。 或使用Postman发消息: POST: http://localhost:8090/ queue /test 消息体:{"aaa" : "queue"}
F12进入调试模式,看打印结果:
...
responseCallback msg=>{"aaa" : "queue"}
------
至此,全部完成
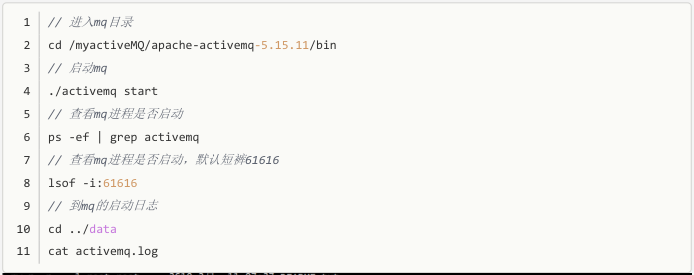
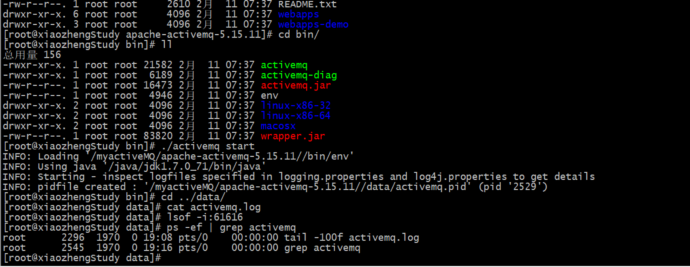
解决activemq安装后启动无反应的问题
笔记本: activeMQ
创建时间: 2023/12/11 14:15 更新时间: 2023/12/11 14:15
解决 ACTIVEMQ 安装后启动无反应的问题, ACTIVEMQ.L
OG 无日志
今天遇到个问题,在云服务中安装activemq,解压后执行./activemq start命令,访问activemq
的页面无反应
同时,在data中的activemq.log并没有任何日志输出(最坑的就是这一点,网上查询很多文
章,都是通过activemq.log来解决问题,但是我的activemq.log没有一行日志,详细见下面配
图)。
找问题过程如下:
通过61616端口查询,发现没有mq进程启动
查询资料,在data/activemq.log中可以看到启动日志,很有可能是因为主机名存在“_”线导
致,或者其他端口被占用,具体的原因在activemq.log查看(最坑的就是这一点,网上查询很
多文章,都是通过activemq.log来解决问题,但是我的activemq.log没有一行日志,详细见下面
配图)。
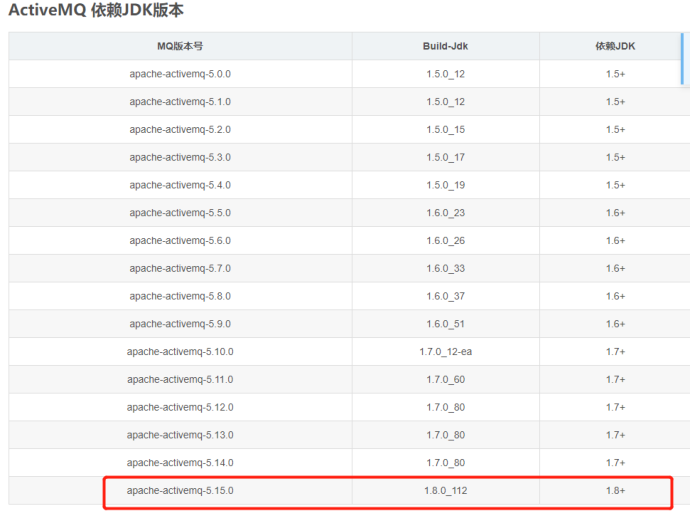
- 从官网上重新下载了active5.15的其他版本,依旧是同样的问题,毫无日志。
- 于是在想是不是jdk版本的问题导致的,如果真的是版本的问题,activemq应该也会在
activemq.log里面打印提醒,实在没有办法的情况下,查询了avtivemq适配的jdk版本,如下
图,发现 activemq5.15版本以上确实需要jdk1.8,但是activemq并没有任何的报错提示,这可
能是activemq的Bug把,果断采用了activemq5.14版本的,果真可以了
6、这时候能看到日志了,具体出现什么错误,在根据日志去解决
如何查看官方发布ActiveMQ依赖JDK版本
以版本 apache-activemq-5.15.0 为例
方法1:查看 release-note

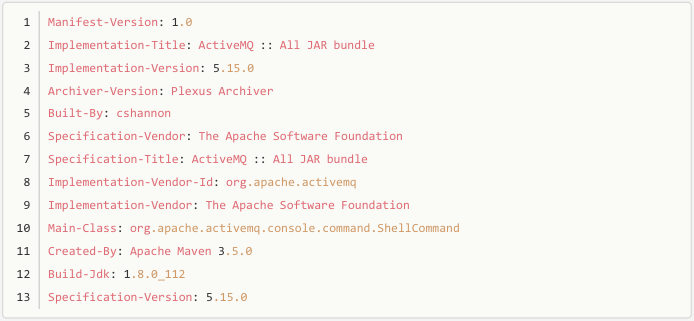
方法2:查看文件 activemq-all-*.jar/META-INF/MANIFEST.MF 属性值 Build-Jdk
SpringBoot整合activemq-CSDN博客
笔记本: activeMQ
创建时间: 2023/12/11 14:07 更新时间: 2023/12/11 14:13
SpringBoot整合activemq
1.安装activemq(linux)
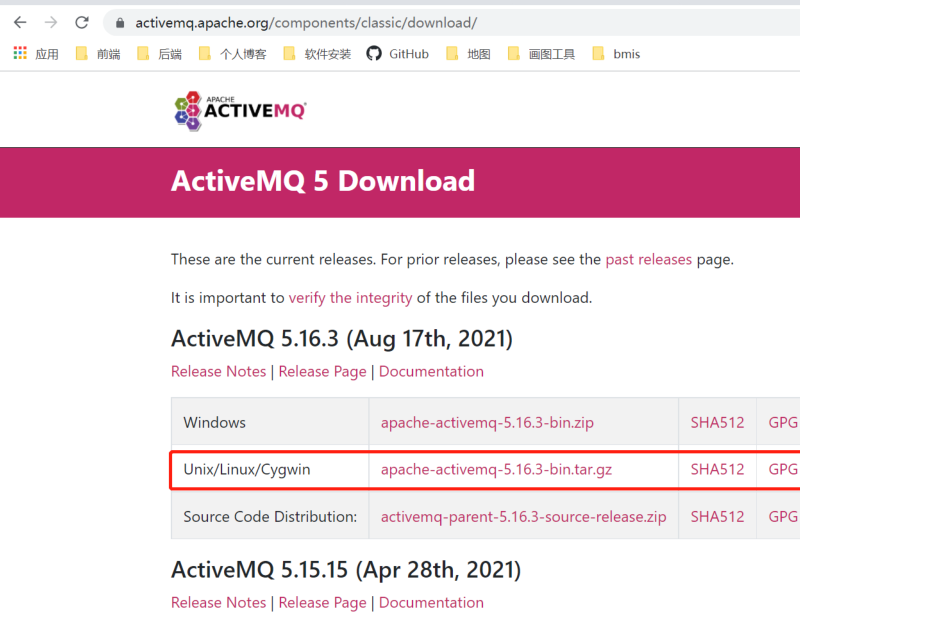
1.下载压缩包,地址链接: https://activemq.apache.org/components/classic/download/.
2.利用xshell上传压缩包到linux上,并且解压
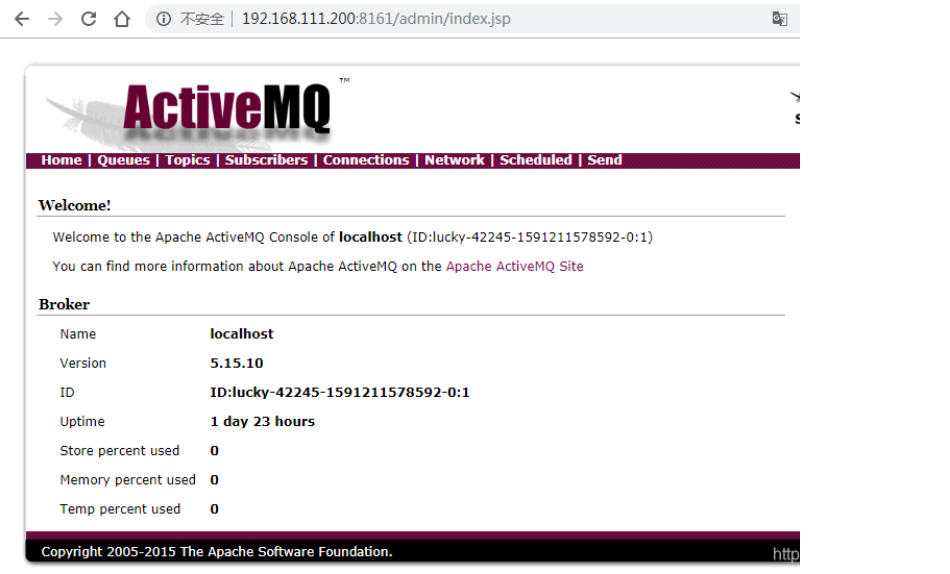
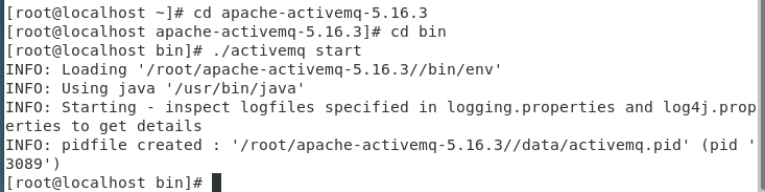
3.进入到bin目录启动,通过./activemq start命令启动activemq
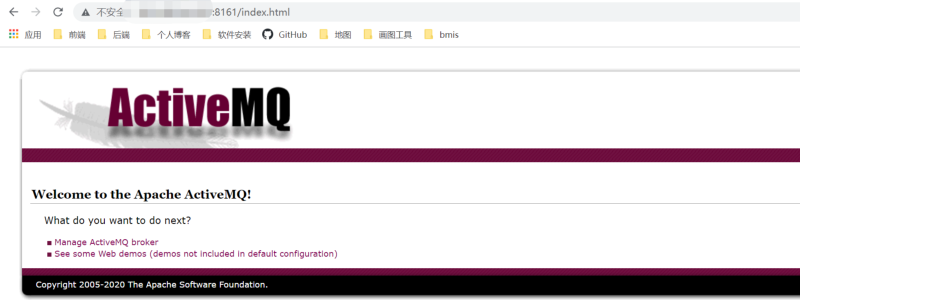
4.在宿主主机范文虚拟机ip地址加上端口号8161,会出现登录弹框叫我们输入用户名和密码,
用户名和密码都是admin。如下界面即代表active安装成功
5.要注意的坑!
1)linux主机和宿主主机的防火墙都要关闭
2)linux主机和宿主主机一定要互ping得通
3)如果linux主机和宿主主机互ping得通,但是却访问不了activemq的端口,
那就参考这篇文章,把conf目录下的jetty.xml文件中的地址为linux主机的ip地址,就可以访问了。
文章链接: https://blog.csdn.net/fengtangjiang/article/details/108463714.
4)activemq还依赖 java环境 ,所以linux上也要安装java环境
2.SpringBoot整合activemq案例
2.1 pom.xml
<?xml version="1.0" encoding="UTF-8"?>
<project xmlns="http://maven.apache.org/POM/4.0.0" xmlns:xsi="http://www.w3.org/2001/XMLSchema-instance"
xsi:schemaLocation="http://maven.apache.org/POM/4.0.0 https://maven.apache.org/xsd/maven-4.0.0.xsd">
    <modelVersion>4.0.0</modelVersion>

    <parent>
        <groupId>org.springframework.boot</groupId>
        <artifactId>spring-boot-starter-parent</artifactId>
        <version>2.6.3</version>
        <relativePath/> <!-- lookup parent from repository -->
    </parent>
    <groupId>com.yl</groupId>
    <artifactId>jms</artifactId>
    <version>0.0.1-SNAPSHOT</version>
    <name>jms</name>
    <description>Demo project for Spring Boot</description>
    <properties>
        <java.version>11</java.version>
    </properties>

    <dependencies>
        <dependency>
            <groupId>org.springframework.boot</groupId>
            <artifactId>spring-boot-starter-activemq</artifactId>
        </dependency>
        <dependency>
            <groupId>org.springframework.boot</groupId>
            <artifactId>spring-boot-starter-web</artifactId>
        </dependency>

        <dependency>
            <groupId>org.springframework.boot</groupId>
            <artifactId>spring-boot-starter-test</artifactId>
            <scope>test</scope>
        </dependency>
    </dependencies>

    <build>
        <plugins>
            <plugin>
                <groupId>org.springframework.boot</groupId>
                <artifactId>spring-boot-maven-plugin</artifactId>
            </plugin>
        </plugins>
    </build>

</project>
2.2 application.properties
# activemq 的配置
# 地址
spring.activemq.broker-url=tcp ://192.168.244.135:61616
# 信任所有的包
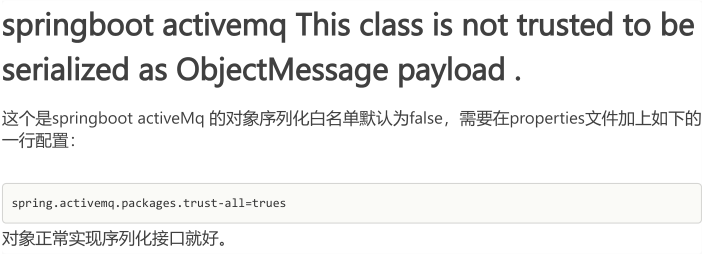
spring.activemq.packages.trust-all=true
# 用户名
spring.activemq.user=admin
# 密码
spring.activemq.password=admin
2.3 消息实体
import java.io.Serializable;
import java.util.Date;

public class Message implements Serializable {

    private String content;
    private Date date;

    public String getContent() {
        return content;
    }

    public void setContent(String content) {
        this.content = content;
    }

    public Date getDate() {
        return date;
    }

    public void setDate(Date date) {
        this.date = date;
    }

    @Override
    public String toString() {
        return "Message{" +
        "content='" + content + '\'' +
        ", date=" + date +
        '}';
    }
}
2.4 主程序
import org.apache.activemq.command.ActiveMQQueue;
import org.springframework.boot.SpringApplication;
import org.springframework.boot.autoconfigure.SpringBootApplication;
import org.springframework.context.annotation.Bean;

import javax.jms.Queue;

@SpringBootApplication
public class JmsApplication {

    public static void main(String[] args) {
        SpringApplication.run(JmsApplication.class, args);
    }

    @Bean
    Queue queue() {
        return new ActiveMQQueue("yl-queue");
    }

}
2.5 定义消息的发送和接收方法
import com.yl.jms.model.Message;
import org.springframework.beans.factory.annotation.Autowired;
import org.springframework.jms.annotation.EnableJms;
import org.springframework.jms.annotation.JmsListener;
import org.springframework.jms.core.JmsMessagingTemplate;
import org.springframework.stereotype.Component;
import javax.jms.Queue;
@Component
public class JmsComponent {
//消息发送模板
@Autowired
JmsMessagingTemplate jmsMessagingTemplate;
@Autowired
Queue queue;
//发送消息
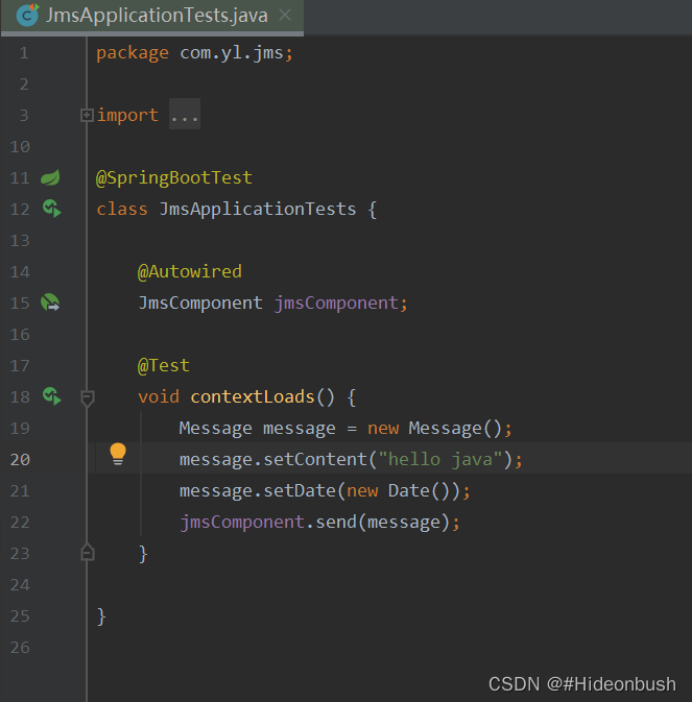
public void send(Message message) {
jmsMessagingTemplate.convertAndSend(queue,message);
}
//接收消息
@JmsListener(destination = "yl-queue")
public void receive(Message message) {
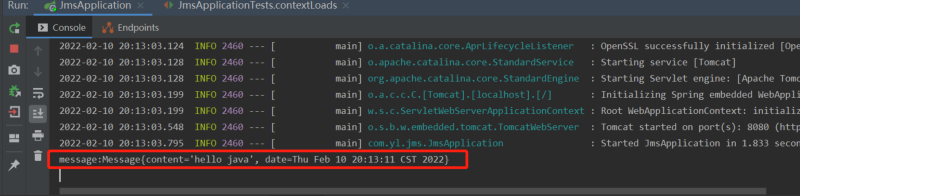
System.out.println("message:" + message);
}
}
2.5 测试
ActiveMQ中Topic模式队列和Queue模式队列区别
笔记本: activeMQ
创建时间: 2023/12/11 13:35 更新时间: 2023/12/11 13:36
ActiveMQ中Topic模式队列和Queue模式队列区别
Topic和Queue是 ActiveMQ 两种消息模式。Topic用于消息订阅,属于一对多;Queue用于消息处
分别从工作模式、有无状态、传递完整性、处理效率四个方面比较
工作模式:
Topic是“订阅-发布”模式,如果当前没有订阅者,消息将会被丢弃,
如果有多个订阅者,那么这些订阅者都会受到消息;
Queue是“ 负载均衡 ”模式,如果当前没有消费者,消息不会被丢弃;
如果有多个消费者,那么一条消息也只能发送给一个消费者,并且要求消费者ack信息。
有无状态: Topic无状态;Queue 数据默认会在mq服务器上以文件的形式存储,
比如activemq一般保存在$AMQ_HOME/data/kr-store/data下面,也可以配置成DB存储。
传递完整性: Topic模式如果没有订阅,消息就会被丢弃。Queue消息不会被丢弃。
处理效率: 由于消息会随着订阅者的数量进行复制,所以处理性能会随着订阅者的增加而明显降低,
并且还要结合不同的消息协议自身的性能差异;Queue模式由于一条消息只能被一个消费者消费,
所以就算消费者再多,性能也不会有明显降低,当然不同的消息协议的具体性能也是有差异的。
ActiveMQ的Queue与Topic区别 - 我是司 - 博客园
笔记本: activeMQ
创建时间: 2023/12/11 13:28 更新时间: 2023/12/11 13:33
ActiveMQ的Queue与Topic区别
队列(Queue)和主题(Topic)是JMS支持的两种消息传递模型:
1、点对点(point-to-point,简称PTP)Queue消息传递模型:
通过该消息传递模型,一个应用程序(即消息生产者)可以向另外一个应用程序(即消息消费者)发送
消息。在此传递模型中,消息目的地类型是队列(即Destination接口实现类实例由Session接口实现类实例
通过调用其createQueue方法并传入队列名称而创建)。消息首先被传送至消息服务器端特定的队列中,然
后从此对列中将消息传送至对此队列进行监听的某个消费者。同一个队列可以关联多个消息生产者和消息消费
者,但一条消息仅能传递给一个消息消费者。如果多个消息消费者正在监听队列上的消息,,JMS消息服务器
将根据“先来者优先”的原则确定由哪个消息消费者接收下一条消息。如果没有消息消费者在监听队列,消息
将保留在队列中,直至消息消费者连接到队列为止。这种消息传递模型是传统意义上的懒模型或轮询模型。在
此模型中,消息不是自动推动给消息消费者的,而是要由消息消费者从队列中请求获得。
2、发布/订阅(publish/subscribe,简称pub/sub)Topic消息传递模型:
通过该消息传递模型,应用程序能够将一条消息发送给多个消息消费者。在此传送模型中,消息目的地
类型是主题(即Destination接口实现类实例由Session接口实现类实例通过调用其createTopic方法并传入主
题名称而创建)。消息首先由消息生产者发布至消息服务器中特定的主题中,然后由消息服务器将消息传送至
所有已订阅此主题的消费者。主题目标也支持长期订阅。长期订阅表示消费者已注册了主题目标,但在消息到
达目标时该消费者可以处于非活动状态。当消费者再次处于活动状态时,将会接收该消息。如果消费者均没有
注册某个主题目标,该主题只保留注册了长期订阅的非活动消费者的消息。与PTP消息传递模型不同,
pub/sub消息传递模型允许多个主题订阅者接收同一条消息。JMS一直保留消息,直至所有主题订阅者都接收
到消息为止。pub/sub消息传递模型基本上是一个推模型。在该模型中,消息会自动广播,消息消费者无须
通过主动请求或轮询主题的方法来获得新的消息。
具体区别对比如下:
| 类型 | Topic | Queue |
|---|---|---|
| 概要 | Publish Subscribe messaging 发布订阅消息 | Point-to-Point 点对点 |
| 有无状态 | topic数据默认不落地,是无状态的。 | Queue数据默认会在mq服务器上以文件形式保存,比如Active MQ一般保存在$AMQ_HOME/data/kr-store/data下面。也可以配置成DB存储。 |
| 完整性保障 | 并不保证publisher发布的每条数据,Subscriber都能接受到。 | Queue保证每条数据都能被receiver接收。 |
| 消息是否会丢失 | 一般来说publisher发布消息到某一个topic时 ,只有正在监听该topic地址的sub能够接收到消息;如果没有sub在监听 ,该topic就丢失了。 | Sender发送消息到目标Queue,receiver可以异步接收这个Queue上的消息 。Queue上的消息如果暂时没有receiver来取 ,也不会丢失。 |
| 消息发布接收策略 | 一对多的消息发布接收策略,监听同一个topic地址的多个sub都能收到publisher发送的消息。Sub接收完通知mq服务器 | 一对一的消息发布接收策略,一个sender发送的消息,只能有一个receiver接收。receiver接收完后,通知mq服务器已接收,mq服务器对queue里的消息采取删除或其他操作。 |
spring.jms.pub-sub-domain有什么用
笔记本: activeMQ
创建时间: 2023/12/11 13:27 更新时间: 2023/12/11 13:28
spring.jms.pub-sub-domain有什么用
mq的topic起作用:
spring.jms.pub-sub-domain=true
mq的queue起作用:
spring.jms.pub-sub-domain=false
springboot activemq This class is not trusted to be serialized as ObjectMessage payload .
笔记本: activeMQ
创建时间: 2023/12/11 13:25 更新时间: 2023/12/11 13:26
Linux下安装activeMQ
笔记本: activeMQ
创建时间: 2022/8/17 13:55 更新时间: 2022/8/17 14:05
作者: 彼岸樱速
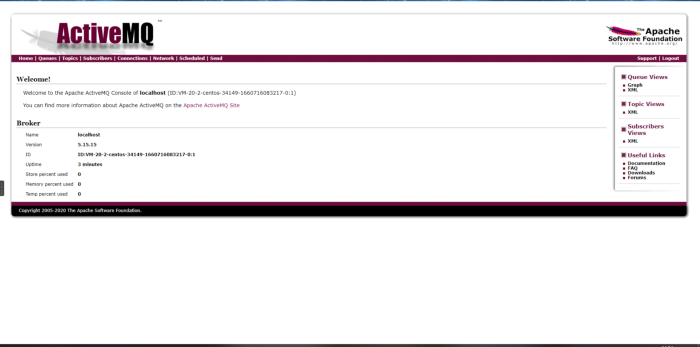
Linux下安装activeMQ 目前尽量下载5.15.15及以下版本,5.16.0版本及以上支持jdk1.9。
一、官网下载,查看所有的 版本:
https://activemq.apache.org/download-archives
二、安装activemq 1、解压启动
tar -zxvf apache-activemq-5.15.15-bin.tar.gz

cd /xxx/apache-activemq-5.15.15/bin
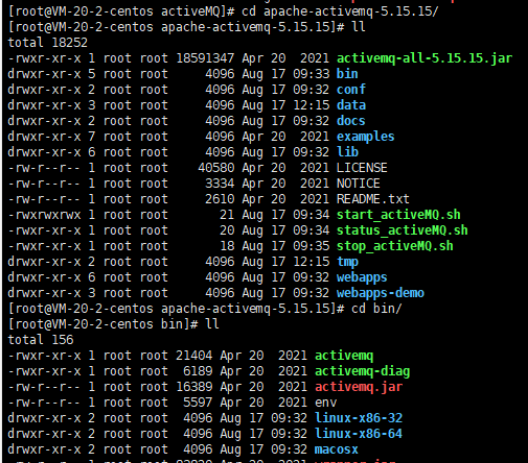
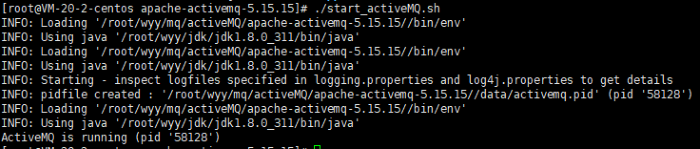
启动:
./activemq start
查看监听:
netstat -anp|grep 61616

假如权限不够可以修改文件夹权限 chmod 777
三、管理界面:
http://ip地址:8161/admin/ 默认用户名密码:admin/admin